Anjou Pants
sewing pattern


About the Anjou Pants
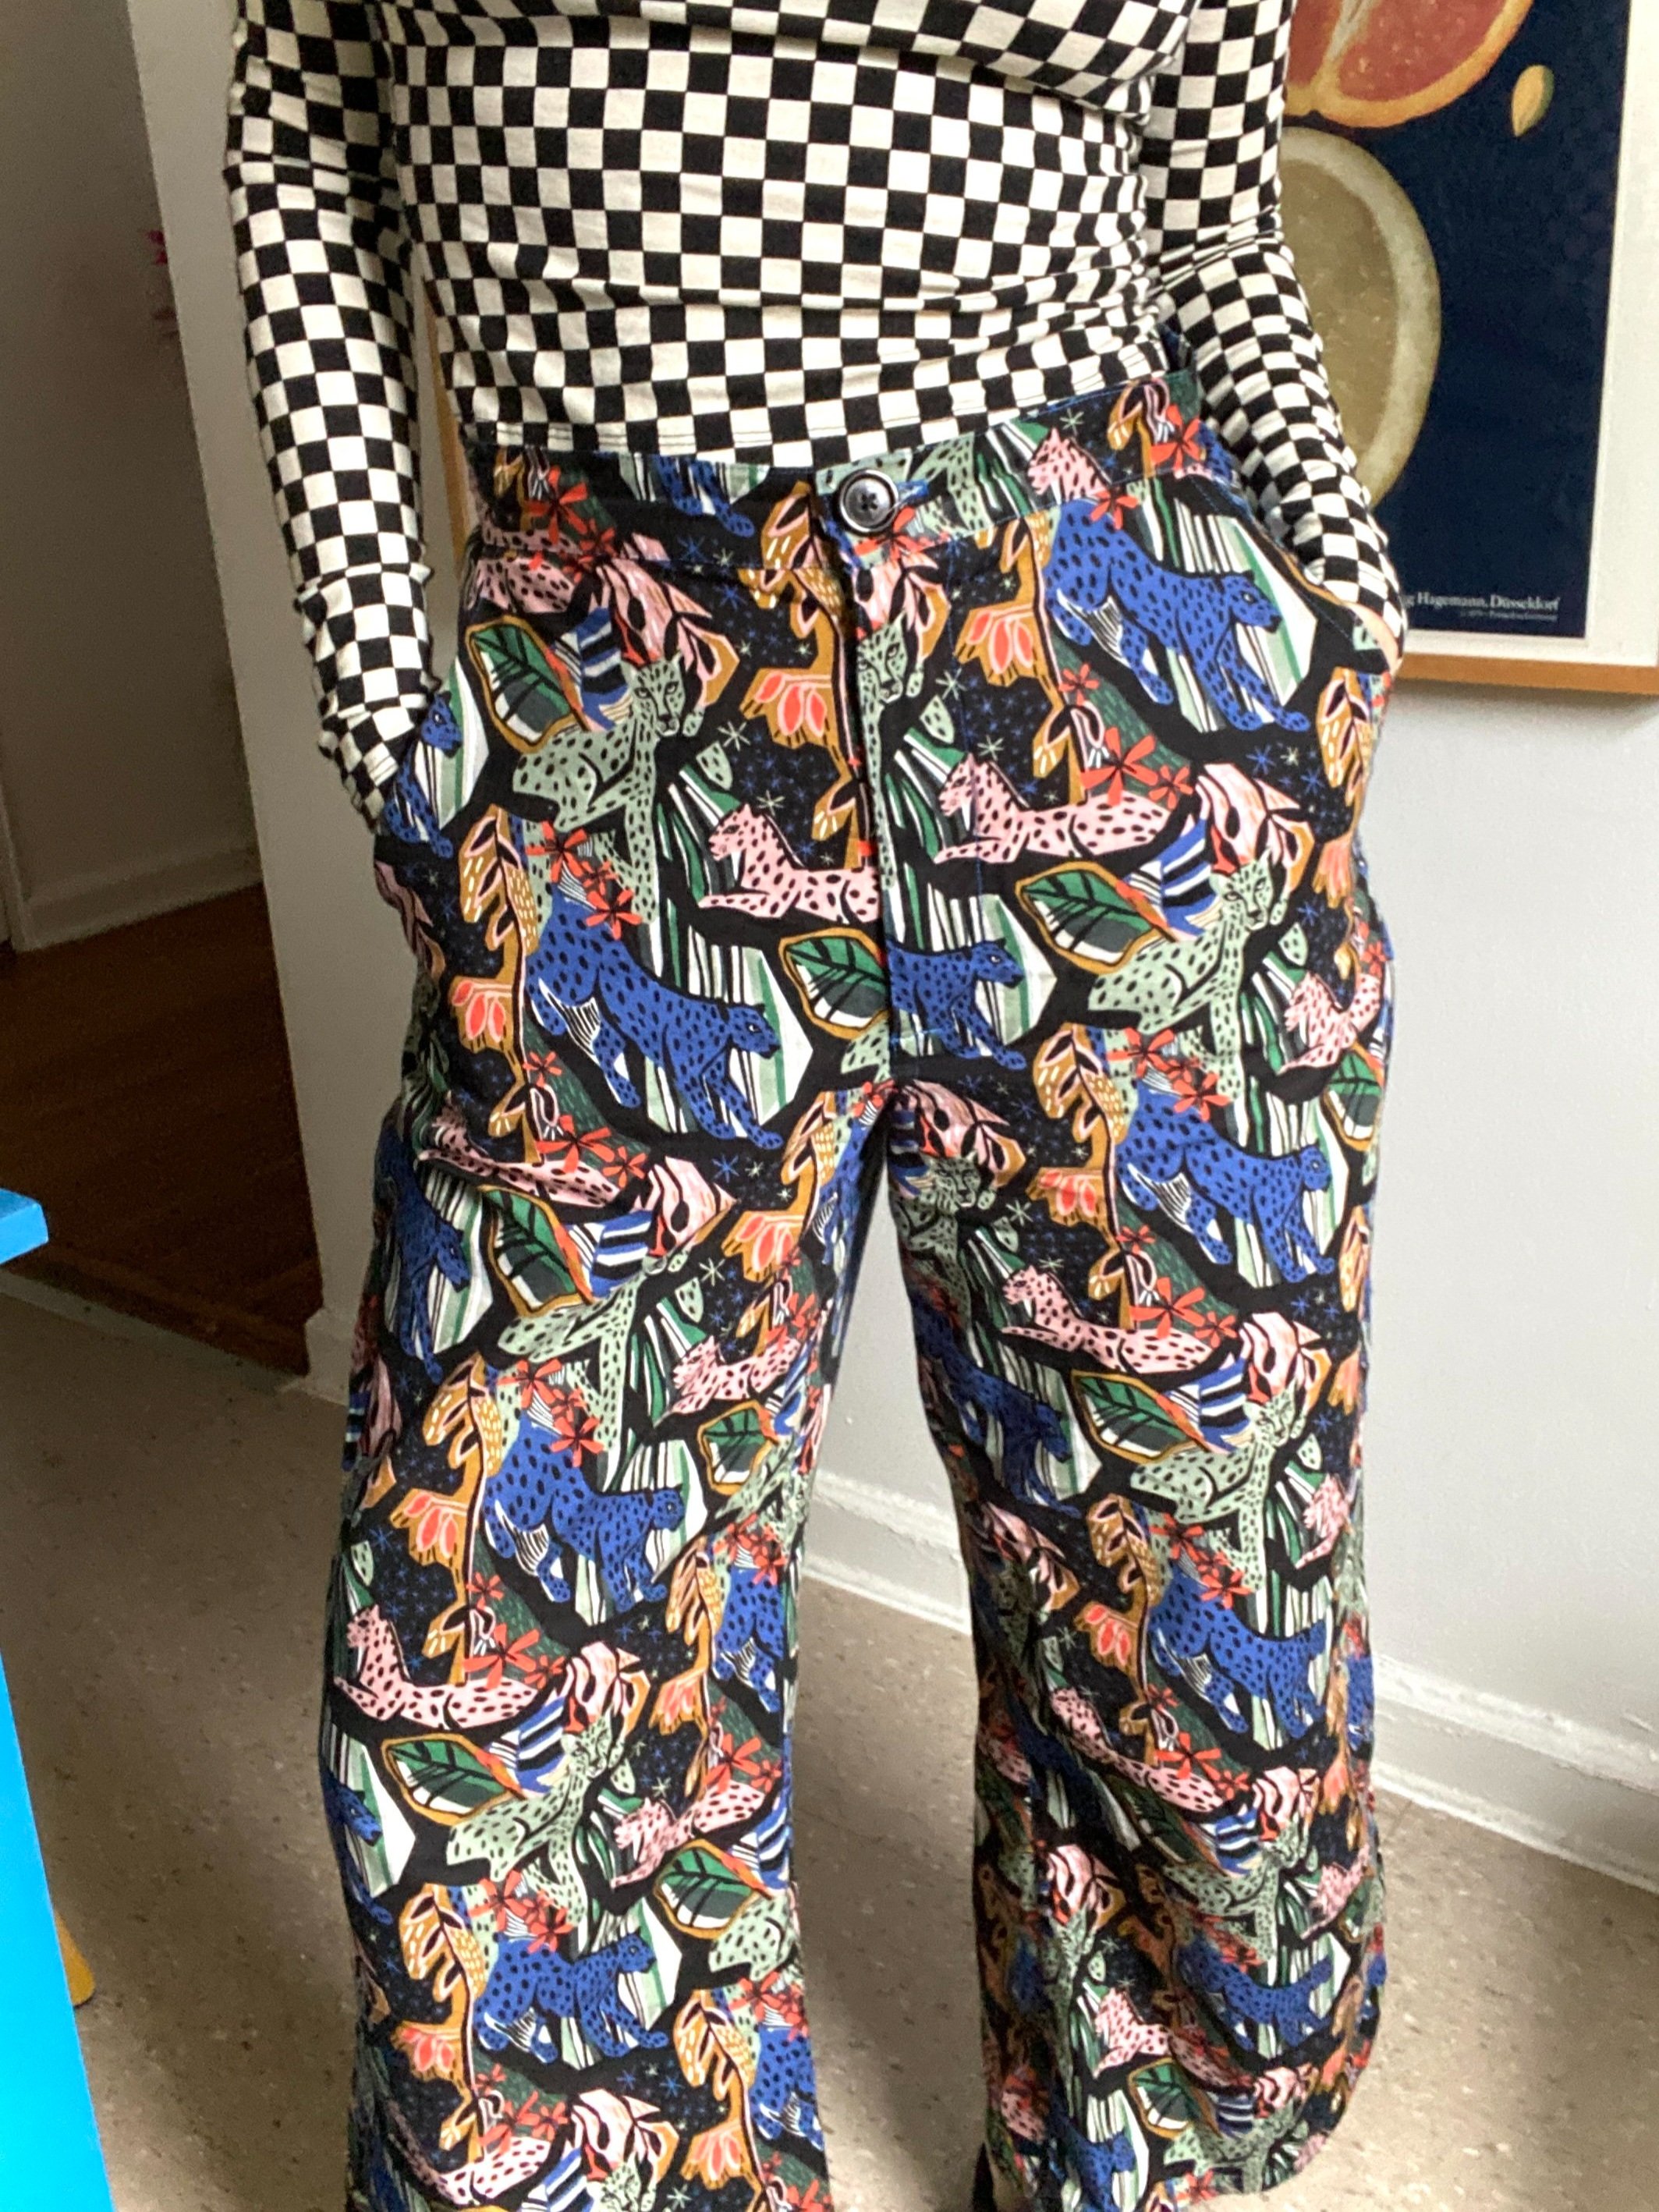
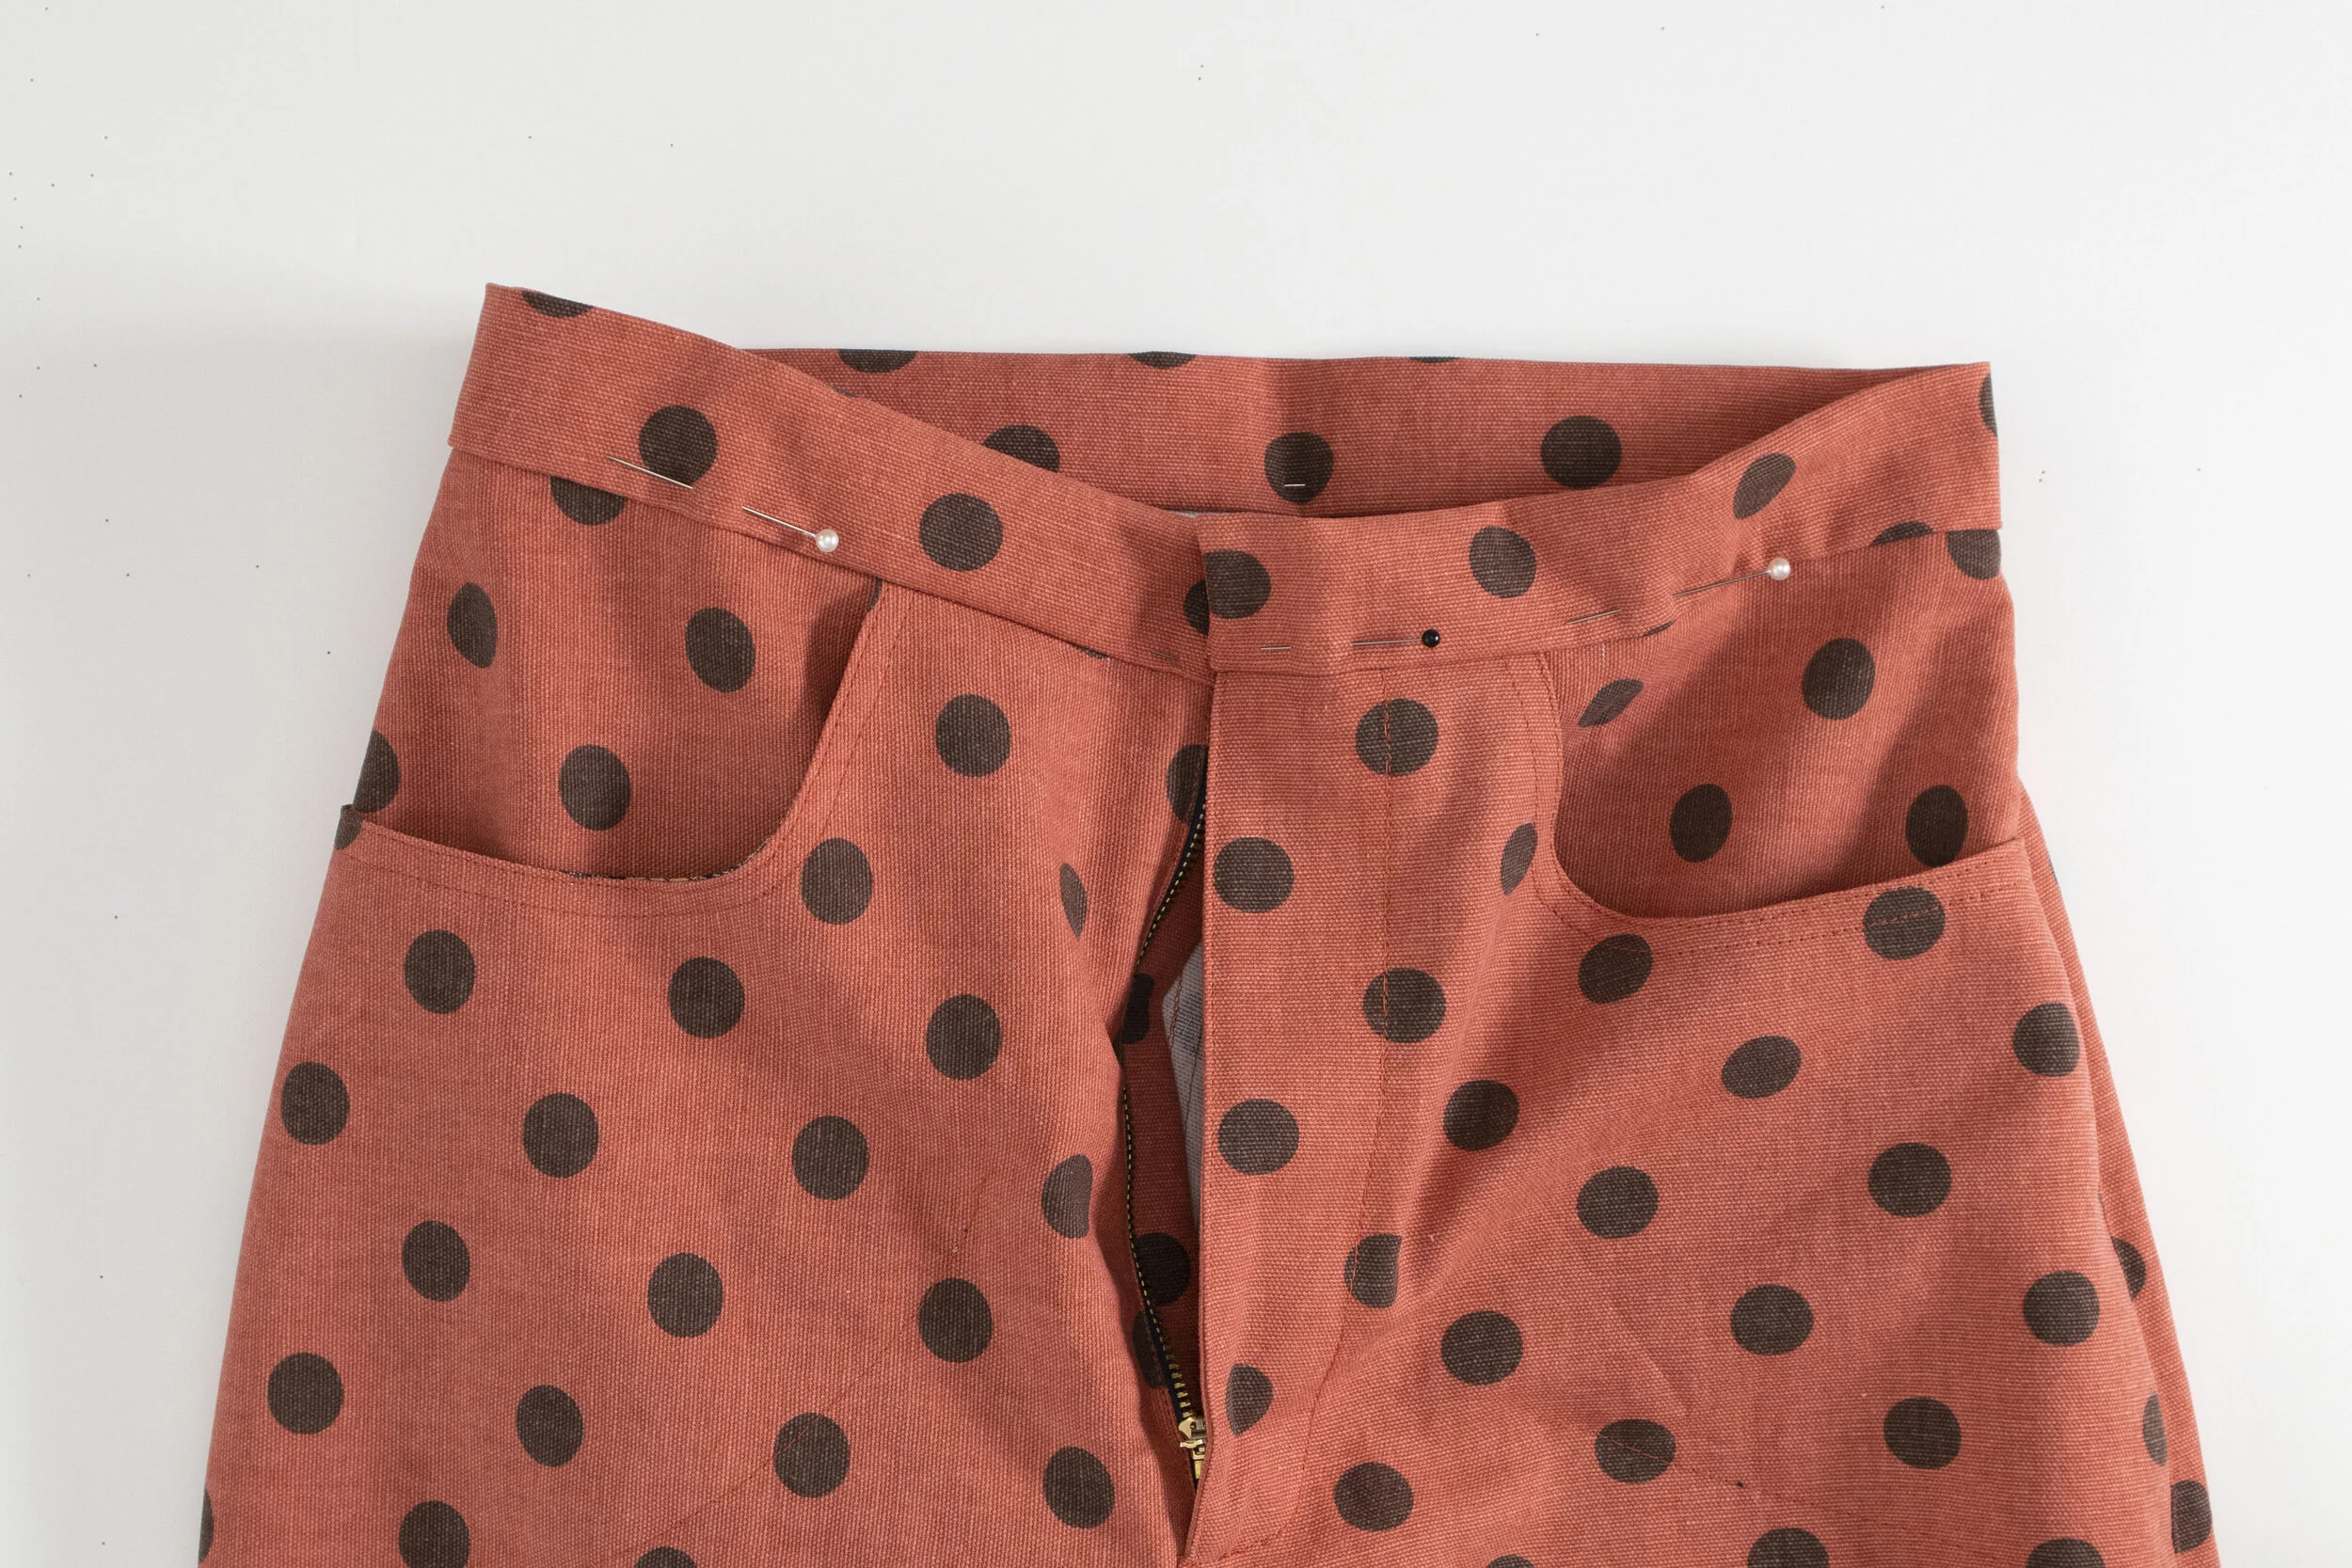
The Anjou Pants are a petite curvy sewing pattern. They feature a high waist and are fuller in the hips, butt, and thighs. They are straight-leg with a very slight taper at the ankle and have two darts in the back. In the images above, I am wearing a size-6, which is a couple of sizes smaller than what I would typically buy, but according to ‘petite curvy’ charts, size-6 is where I land. So, be sure to go by the measurements on the chart (page 2 of the PDF) and not by what you usually wear. This pattern offers two front pocket options—a curve and a slash. The curve makes the pants look a bit more like jeans, and the slash, like dress pants. The front pockets are quite generous in size; a back pocket pattern is also included—sometimes I use it, and sometimes I don’t! All of the above versions were sewn with medium-weight cotton no-stretch fabrics, such as; twill, canvas, and cotton duck. Medium-weight denim would also be a great choice. The Anjou Pants pattern is appropriate for intermediate sewists. Beginners may have to turn to YouTube for a few further explanations but should not be intimidated. You got this!! (Scroll down for sewing instructions.) It may sound like hyperbole, but these pants have changed my life! After YEARS of struggling to find pants that actually fit over my hips without being 4 inches too big in the waist, I finally sat down to design my own. I am so thrilled with the results. I am never buying pants again!!! It’s my sincerest wish that they work just as well for you! Happy sewing!
Pay What You Can:
I am beyond thrilled to share this pattern with you on a “pay what you can” scale. Thank you!
Click below to download the pattern. This file is sizes 00 - 20 in US letter.
Sewing Instructions
Once you’ve downloaded the pattern and have followed the instructions for printing, connecting the pages, and cutting out the paper pattern, come back here for step-by-step sewing instructions. Please keep in mind that this is the order of assembly that works best for me, but there are many ways to cook a potato, as they say. So, as long as you are following the given seam allowances, go forth with the methods that work best for you!
Tips:
Always make a muslin or practice garment first. This is important for even the most experienced sewists, especially so for pants. We all have such varied waists, bums, thighs, tummies, and back shapes and proportions, no single pant pattern works perfectly for everyone. This pattern is designed to have a lot of room in the hips, butt, and thighs, but you may find you need even more room (or less)—making a muslin first will help you determine that.
Wash, dry, and iron your fabric(s) in the same way you intend to care for your pants. It’s best to allow any shrinkage to happen before you start sewing.
Cut out all pattern pieces from your fabric, following the grainline and instructions on each piece. Be sure to transfer any darts or makings. (Please note this pattern has two front pocket options; curve and slash, make your choice. No need to cut the other.)
Please make special note of the various seam allowances on this garment. Wherever possible, I have included enough SA to do french seams, as I personally do not have a serger. The SA chart is on page 2 of the PDF, and it is noted on the pattern pieces.
Steps:
ZIPPER FLY:

1.
Start with the two front pant pieces (A) and trim off the 3/8” fly extension from the left front (LF) pant.

2.
Zigzag or overlock the LF and RF crotch curve’s raw edges.

3.
With right sides together, fold the fly shield (H) in half and sew the bottom edge with a 3/8” seam allowance (SA). Trim the corners, turn right side out, and press. Lastly, finish raw sides together with a zigzag stitch.

4.
Apply the interfacing to the back of the fly-facing (I)—Zigzag the raw edges of the fly facing.

5.
With right sides together, pin zipper to the RF pant fly extension. Install your zipper foot on your machine and stitch on the zipper with a 3/8” SA.

6.
Lay the fly shield over the zipper and pin in place. Flip your work over and stitch over the previous line of stitching through all layers.

7.
With the RF pant right-side down, press the fly shield to the left. Flip your work right-side-up and edgestitch on the left of the zipper through all layers.

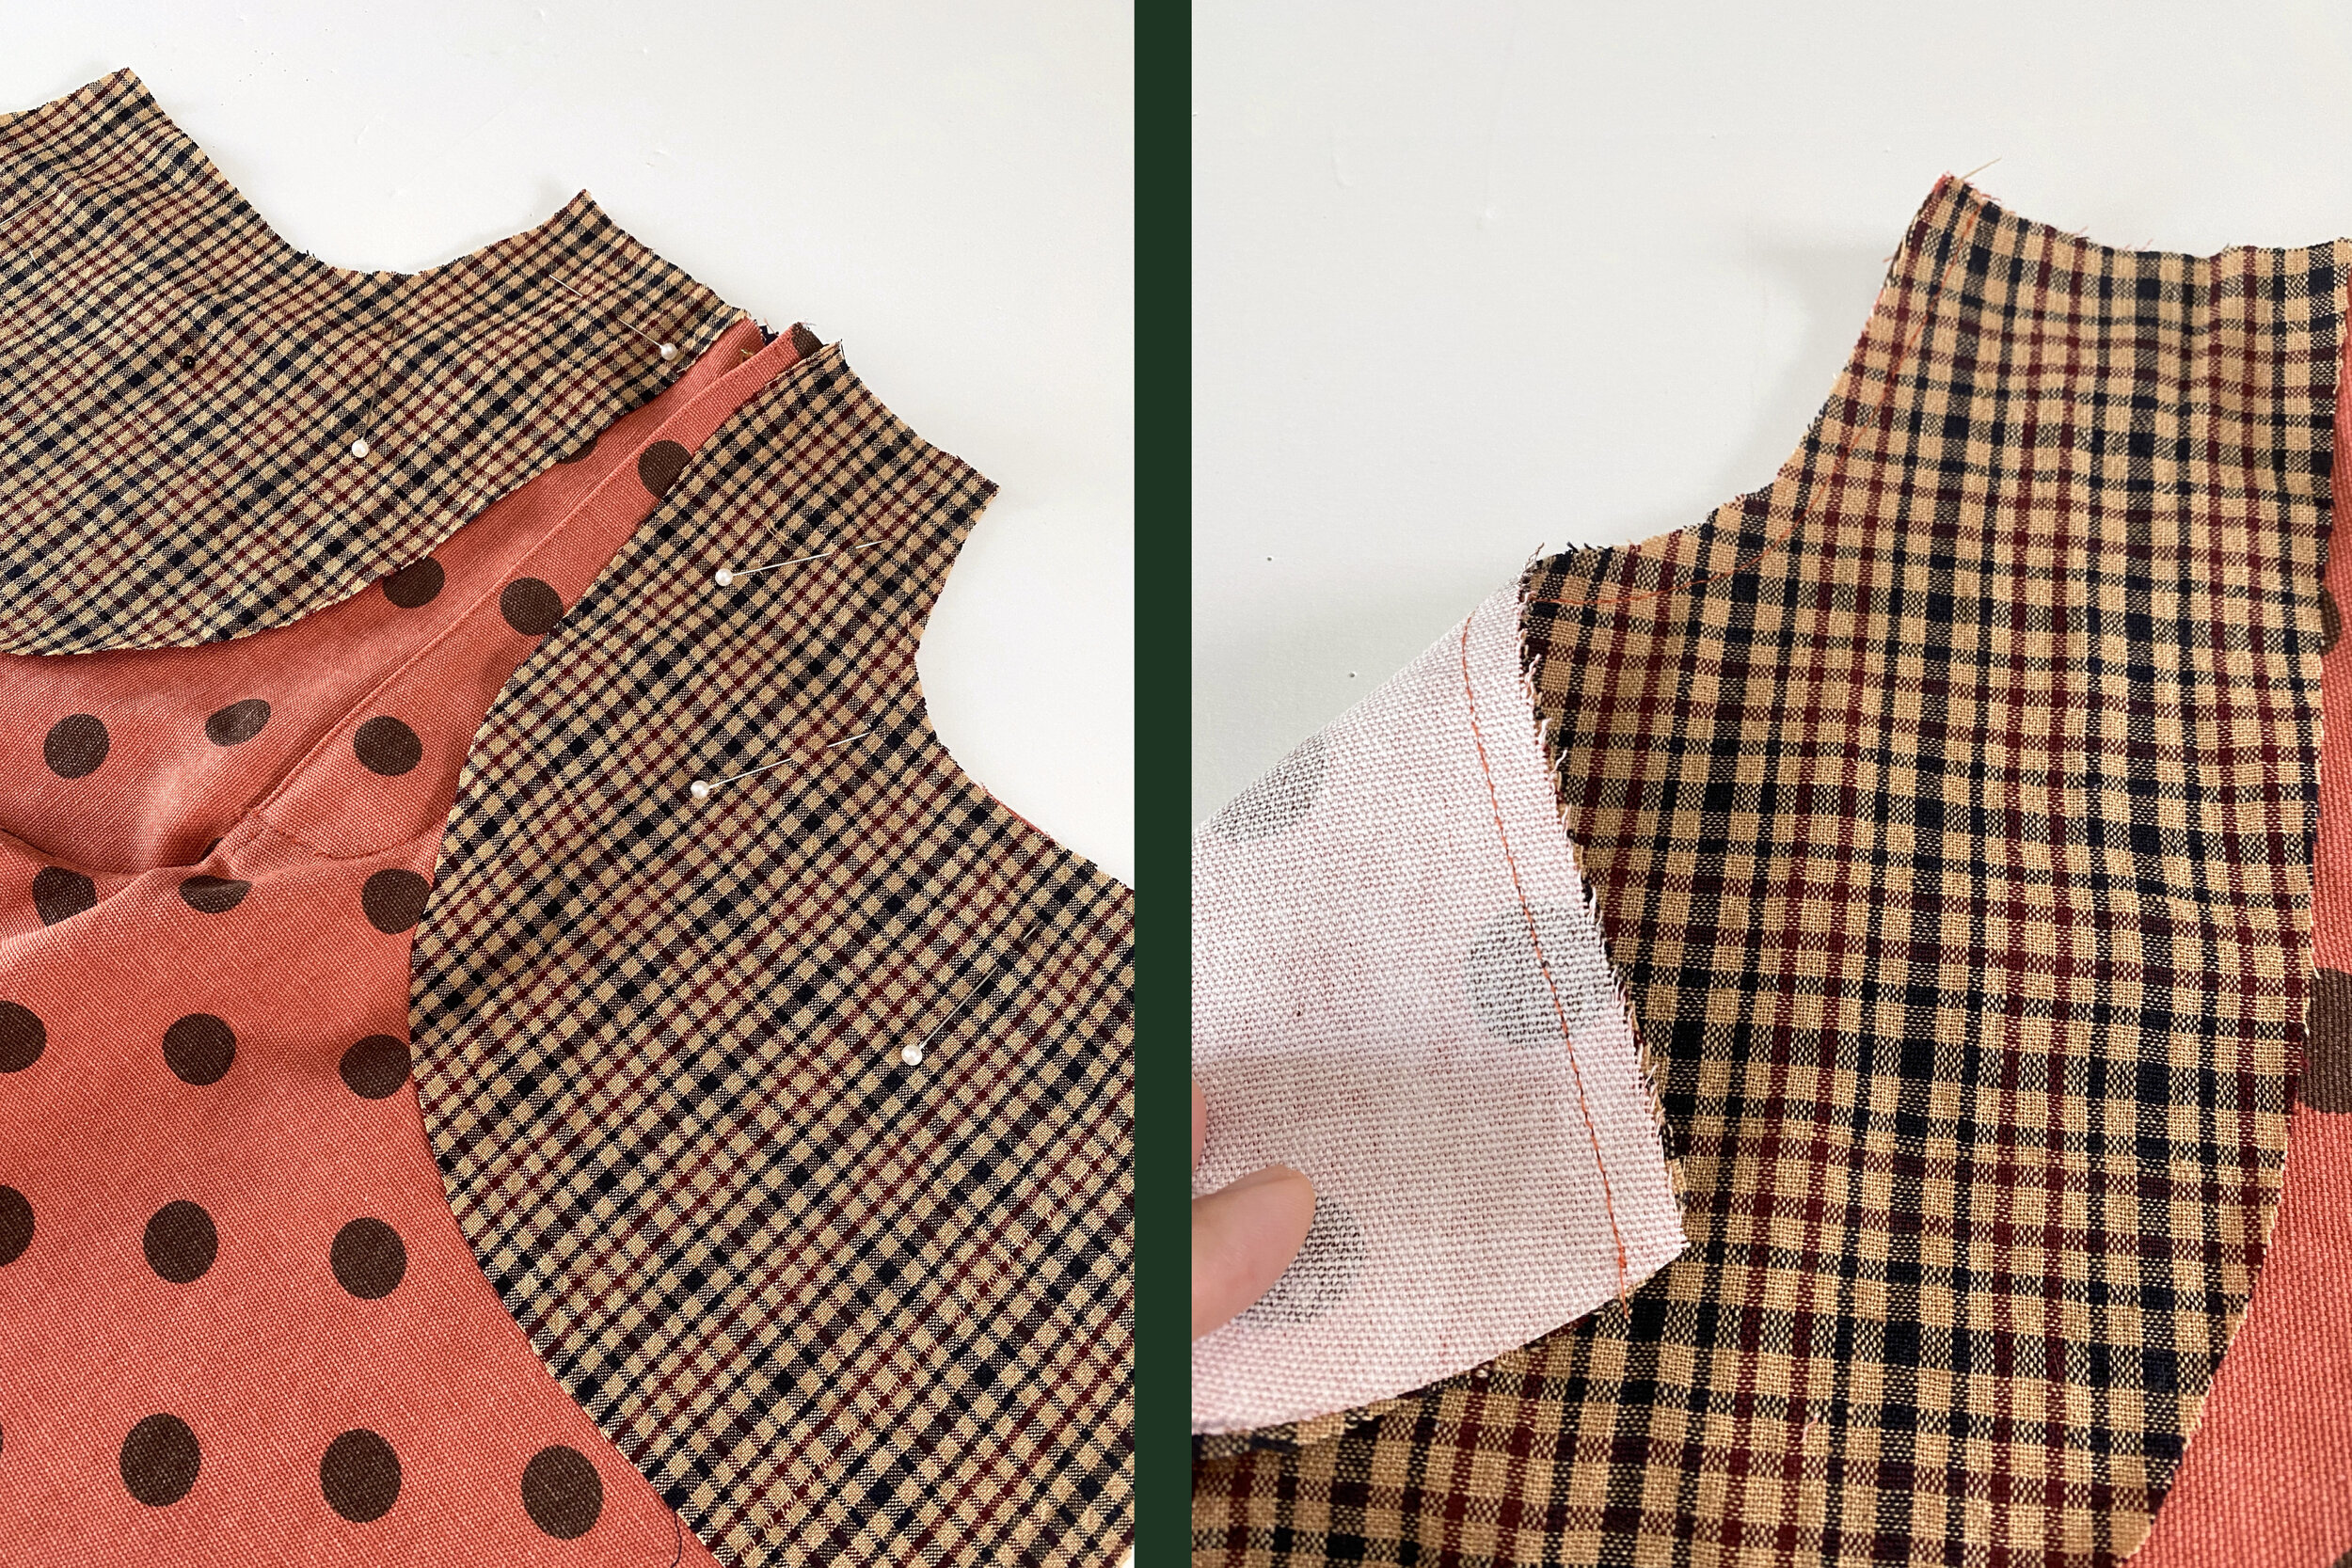
8.
With right sides together, pin the fly facing to the LF pant. Stitch on with 3/8” SA stopping 3/8” from the bottom. Make a small 3/8” snip in the LF pant’s crotch curve perpendicular to where the previous stitch line stopped.

9.
Turn the fly facing to the back and press. With the right side facing up, edgestitch through all layers of the LF pant.

10.
Place LF pant over RF pant right sides together, matching up the crotch curve. Pin in place. Stitch the crotch with a 3/8” SA, stopping at the snip.

11.
Flip your work, so the RF pant is back-side up. Fold and pin the fly shield to the right, so it is out of your way. Open up the fly facing to the left. (You should see the RF center pant 3/8” to the left of the LF pant’s center.)

12.
The zipper should be closed and face down. Pin the zipper to the fly facing and stitch in place using a zipper foot.

13.
Open up the pant front, so the wrong side is facing you. Keep the fly shield pinned to the right, and the fly facing should be laying flat on the left. Mark a stitching line 3/8” in following the curved edge of the fly facing. Baste stitch by hand or machine the fly facing to the LF pant.

14.
Flip your work right-side-up and stitch following the basting stitches. Stop ½” away from the center front at the bottom of the lower curve.

15.
Remove the basting stitches and unpin the fly shield. Finish stitching the last ½” at the bottom of the curve, through all layers, including the fly shield.

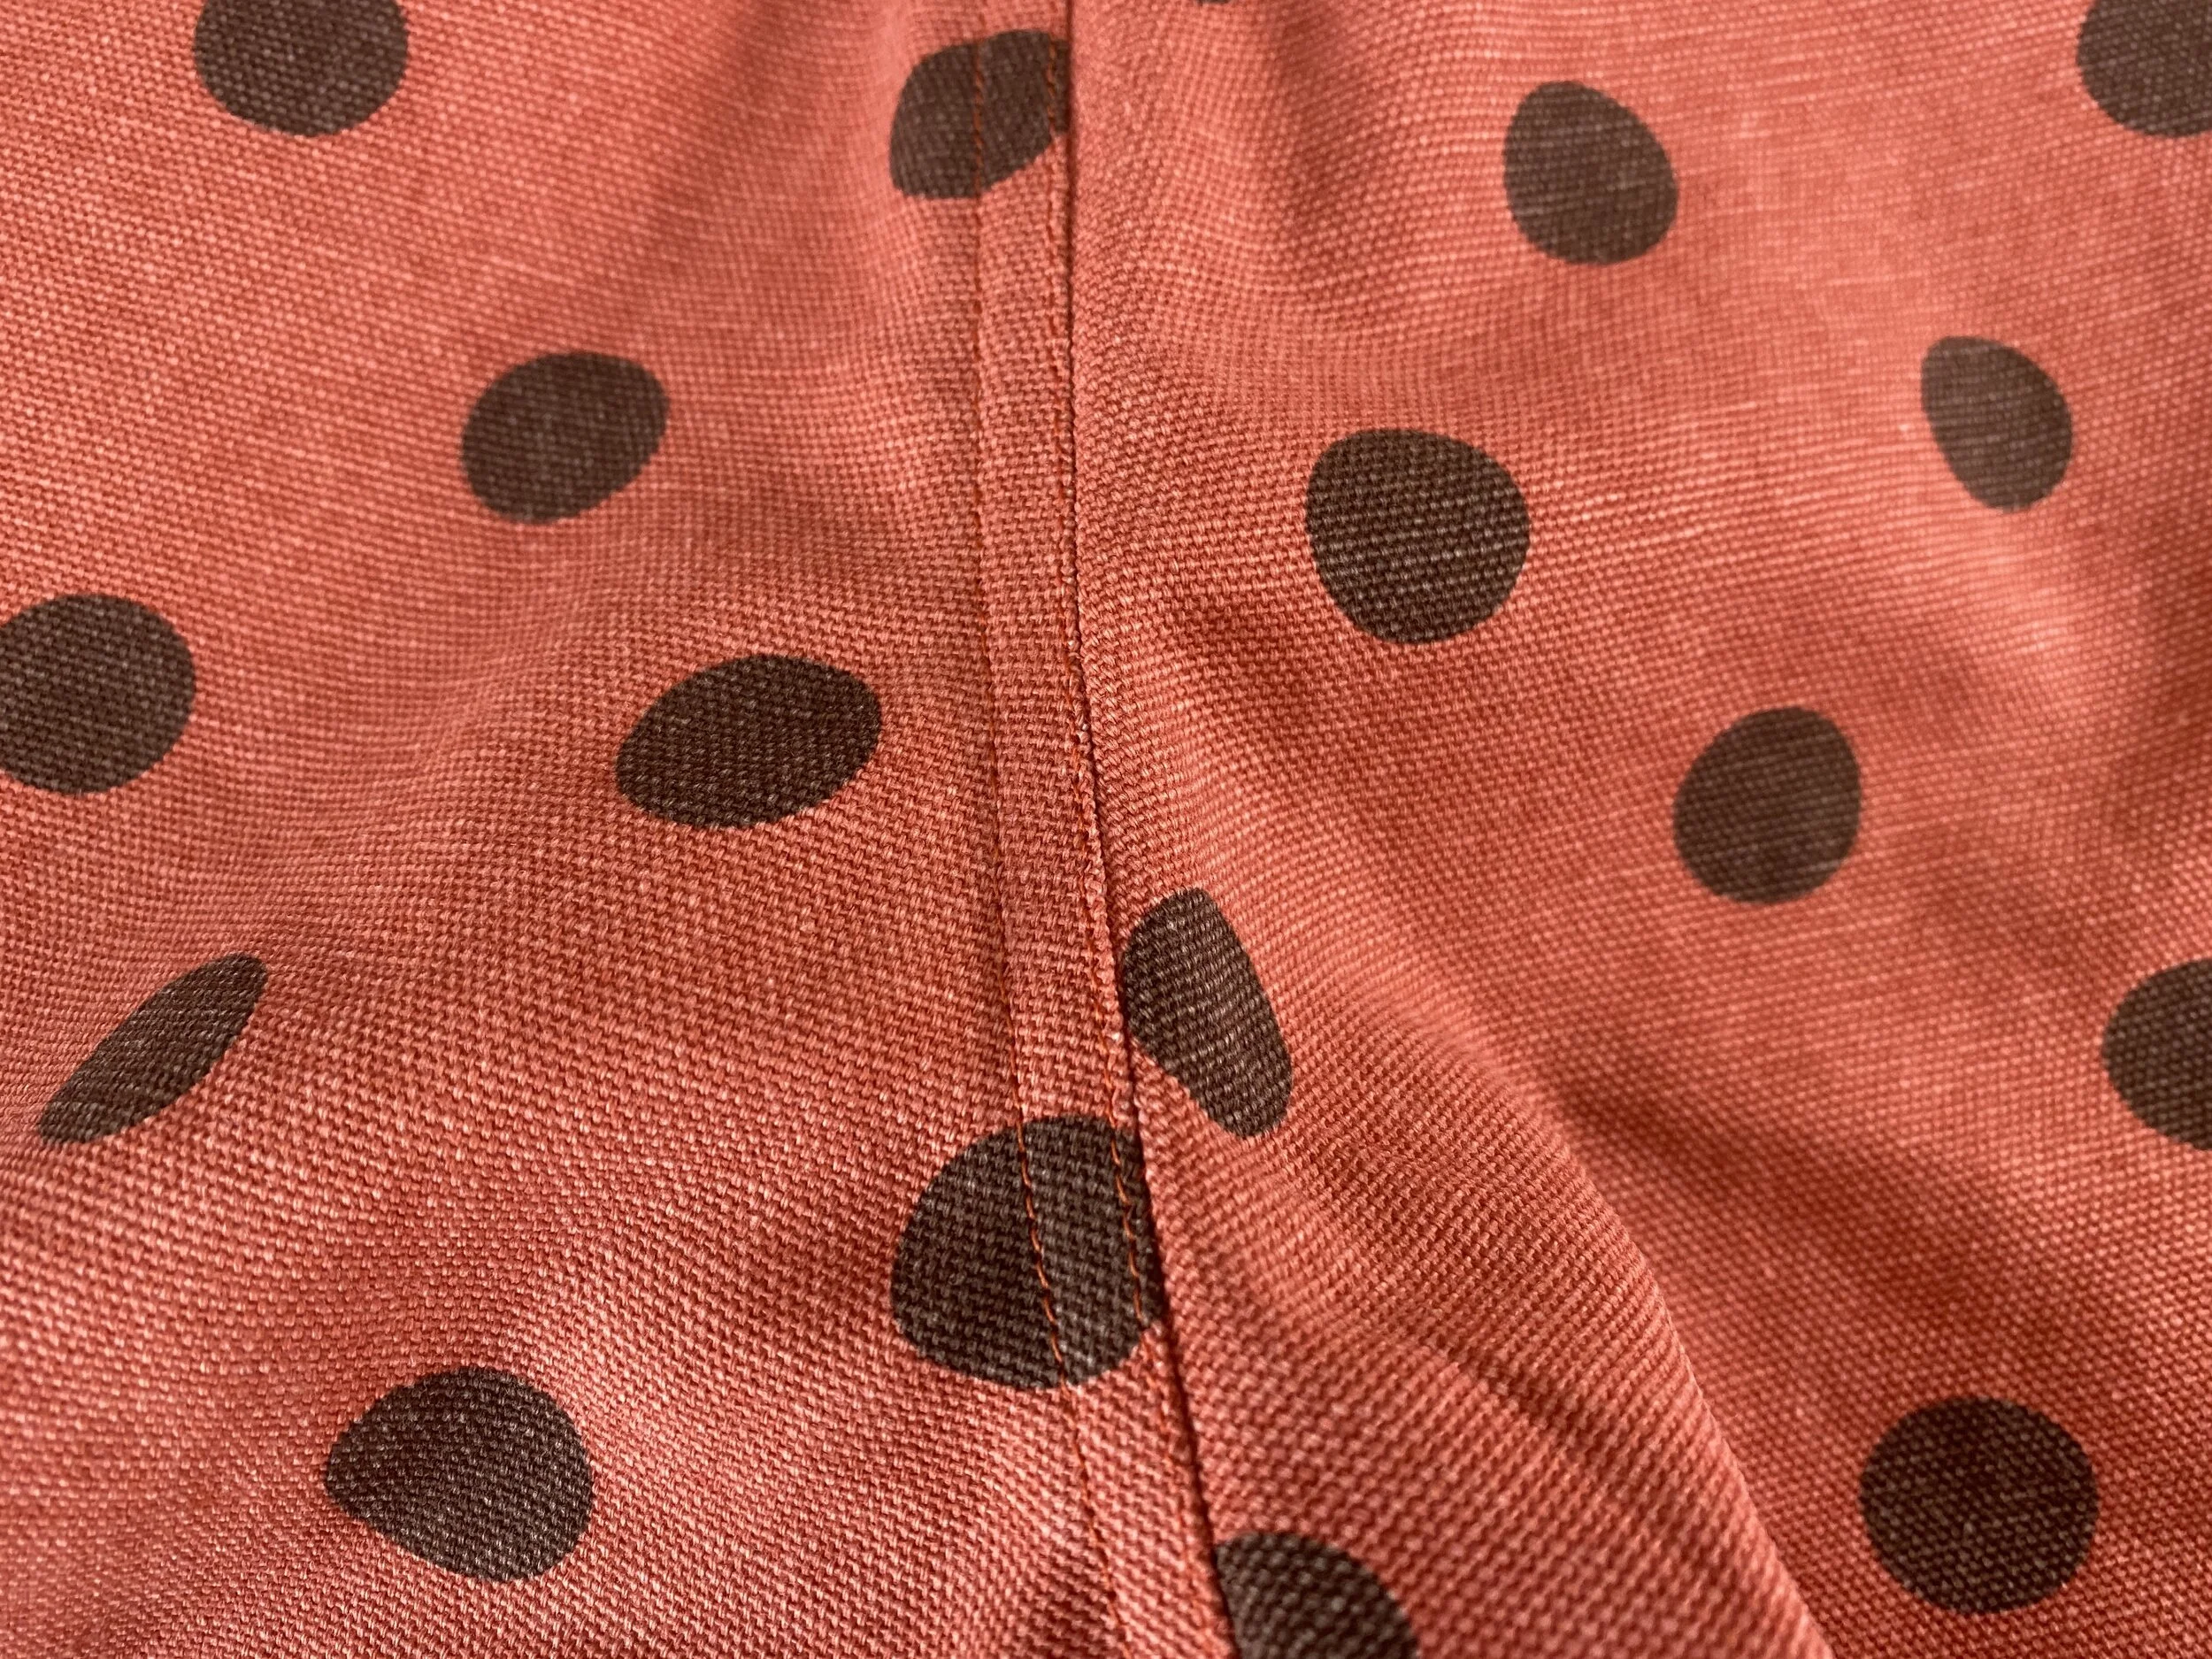
16.
With your work wrong side up, press the front crotch seam towards the left. Flip your work over to be right side facing up—edgestitch the front crotch seam on the LF pant. Add a line of topstitching ¼” away from edgestitch.
FRONT POCKETS:
17.
With your pant front right side up, pin the pocket bag lining fabric (F or G) face-to-face, lining up the sides, waist, and curve/slash. Stitch the curve or slash pocket opening with a 3/8” SA. Repeat for the other side.

18.
For the curve pocket opening, snip the curve. Turn the pocket bag pieces to the inside and press.

19.
Edgestitch the pocket opening and topstitch ¼” away from the edgestitch. Repeat for the other side.

20.
Press under ¼” of the bottom edge of the two pocket-facing pieces (E).

21.
Position the two pocket bag pieces (D) right side up. Place the pocket facing on top, also right sides up—pin in place. Edgestitch the bottom edge of the pocket facing to the pocket bag. Baste stitch the top and sides in place, 1/4” from the edge.

22.
Make sure you’ve marked on the pocket-facing pieces with the placement marks for the pocket opening. Refer back to the paper pattern piece if need be. Position the front pant right side up. Place the lower pocket bag pieces (D+E) under the pant front lining up the top (waist), side, and the markings for the pocket opening. Pin in place at the top and side through all layers.

23.
Flip your work over, make sure both pocket pieces are laying flat and pin the pocket bag pieces together (do not pin through pant).

24.
Stitch the pocket bag together along the inside (near the zipper) and bottom edge with a 1/2” SA. Next, zigzag stitch the raw edge. Repeat for the other pocket.

25.
Flip your work right side facing up and baste stitch the waist and side ¼” from the edge. Repeat on the other side.
Note: I like to baste stitch the pocket bags in place along the bottom curve so that for the remainder of the sewing of the pants they don’t move or get caught in the way. The basting stitches can be easily removed at the end.
BACK PANT:

26.
Fold each side of the back pant together to line up the stitch lines of the dart. Stitch the dart, sewing from the waist to the bottom point. Leave the treads long and tie them together instead of backstitching.

27.
Press both darts towards the back curve. With your back pant piece face up, edgestitch along the dart through all layers. Repeat for the other side.

28.
Baste stitch the top of the darts about ¼” from the edge at the waist.

29.
Place back pant pieces wrong sides together and pin in place. Stitch back curve with 1/4” SA. Open and press the seam. Now, place back pant pieces together right sides facing and stitch back curve with a ½” SA. (Or, use your preferred method of making French seams. You have ¾” in the allowance to work with.)
30.
Press the seam to the back left pant. Flip your work and edgestitch back left. Topstitch ¼” away from edge stitching.
BACK POCKETS:
Note: You can choose to sew on the back pockets now when it’s a bit easier or after you’ve completed the pants. I like to sew on back pockets at the end of the project to find the most flattering position. In this case, I am doing it now as I have made these pants before. But, if you’d like to skip to the next section, and come back here later, that is a-ok!

31.
Fold the top edge by 3/8” two times to create a rolled hem. Press in place. Repeat on the other pocket.

32.
Edgestitch and topstitch (1/4” away from edge stitching) the top edge of both back pockets.

33.
Fold under the other four edges of the back pocket at 3/8” and press in place. Repeat with the other pocket.

34.
Position the back pant right side up and pin the back pockets in place following the markings on the paper pattern piece or the placement you’ve chosen. Stitch around the bottom four edges of the back pocket with an edgestitch and topstitch (1/4” away from edge stitching).

35.
Set your zigzag settings on your machine for bar-tack and stitch a ¼” bar tack at each top corner of both pockets.
ASSEMBLING FRONT + BACK:

36.
Place your front pant on the table right side down, spread out the pant legs so the inseam is positioned horizontally. Lay the back pant over the front wrong sides together. Pin the inseam working from the center front to the bottom of the pants on both legs. Note: The inner pant leg can easily stretch as this area is cut on the bias, do your best not to pull or warp the fabric too much here.

37.
Stitch inseam with 1/4” SA. Open and press the seam. Now, place pant pieces together right sides facing and stitch with a ½” SA. (Or, use your preferred method of making French seams. You have ¾” in the allowance to work with.)

38.
Press the seam towards the front. Edgestitch the inseam at the front.

39.
Position your pants wrong sides facing. Stitch both sides with 1/4” SA. Open and press the seam. Position pant pieces together right sides facing and stitch both side seams with a ½” SA. (Or, use your preferred method of making French seams. You have ¾” in the allowance to work with.)

40.
Press seams towards the back. Turn pants right side out and unzip the zipper. Remove the extension table from your machine. Edgestitch along the side seam working from the waist as far as you can go, maneuvering the pants around the arm of the sewing machine. Then, work from the bottom of the leg, also edge stitching until you’ve completed the line. Repeat on the other side.
WAISTBAND + CLOSURE:
41.
Apply the interfacing to the wrong side of half the waistband inside the SA.

42.
Pin the waistband to the pants, right sides together, matching the notches with the center front at both sides and center back. Stitch on with a ½” SA.

43.
Press all layers of the SA and the waistband up.

44.
At each end, fold the waistband in half, right sides together, and press. Fold up ½” SA on the inside edge and press. Pin in place. Stitch both ends at the center front of pants with a ½” SA. Trim corners and turn right side out.
45.
Press waistband in half wrong sides together and with a ½” SA on the inside edge, making sure to capture all raw edges inside. Pin in place.

46.
With your pants right side up, edgestitch along all four sides of the waistband, being sure to capture the inside raw edge as you sew.

47.
Try your pants on and determine the best placement for your front closure or button.

48.
If using snaps or hooks, stitch on those items. If using a button, install the button foot attachment and follow the instructions for your machine for a buttonhole stitch. Sew a buttonhole in the left front waistband. Lastly, sew on a button to the right-center front waistband.
HEM:

49.
Try on your pants and mark where you’d like the bottom hem to be. The length of each leg needs to be 2” longer than your desired pant leg length. If required, trim the pant legs.

50.
Fold the bottom hem under ½” and press. Next, fold the hem again by 1.5” and press again. Topstitch the hem close to the folded edge. Optional: edgestitch very bottom edge.
Lastly: if you skipped the back pocket step and you’d like back pockets, do that now. Also, if added, remove the basting stitches holding the front pockets in place.


Thank you and happy sewing!
If you share your Anjou Pants on social media, please tag me @corriebethmakes, and use the hashtag: #anjoupants. I would love to see what you make!